If you’ve just received a brand-new 3D sign board and you’re staring at it wondering where to begin — you’re not alone.
Most business owners focus entirely on the design phase. Then the sign arrives, and suddenly the real challenge starts. A poorly installed 3D sign doesn’t just look bad. It can become a safety hazard, fall off within months, or simply fail to make the impact it was built for.
This 3D sign board installation guide walks you through the entire process — from the tools you need to the final electrical check — so your sign goes up clean, secure, and built to last.
Why Proper 3D Sign Board Installation Matters
A beautiful sign can lose everything with a bad install.
Think about it. You invest in premium acrylic channel letters or a backlit stainless steel sign board. But if the mounting is off-centre, the spacing is uneven, or the electrical wiring isn’t handled correctly — the sign loses its authority before a single customer walks through your door.
Beyond aesthetics, there’s a practical side too. Outdoor signage in Malaysia faces intense heat, humidity, and seasonal rain. A sign that isn’t properly anchored to the right surface type simply won’t survive long-term exposure to those conditions.
Done right, a well-installed 3D sign board:
- Stays firmly in place for years without sagging or shifting
- Looks sharp and aligned from every viewing angle
- Passes local authority requirements for commercial signage
- Keeps electrical components safely concealed and protected
Tools and Materials You’ll Need Before You Start
Before anything goes on the wall, gather your equipment. Running back and forth to find tools mid-installation is how mistakes happen.
Essential tools:
- Power drill with masonry or concrete bits
- Spirit level (non-negotiable for alignment)
- Measuring tape and chalk line
- Screwdriver set (flathead and Phillips)
- Silicone sealant or weatherproof adhesive
- Rawl plugs or wall anchors (matched to wall type)
- Mounting template (usually provided with the sign)
- Safety harness or scaffolding if working at height
For illuminated 3D sign boards, you’ll also need wire cutters, cable ties, waterproof junction boxes, and access to a licensed electrician for the final power connection.
Step 1: Survey the Installation Location
Never skip the site survey. Walk up to the wall, look at it carefully, and ask the right questions before drilling a single hole.
Check for the following:
Surface material — Is it brick, concrete, aluminium composite panel (ACP), or glass? Each requires a different anchor type and drilling bit.
Hidden utilities — Use a cable and pipe detector before drilling. Hitting a live wire or a water pipe behind a shopfront wall is a costly (and dangerous) mistake.
Structural integrity — Tap the wall surface gently. A hollow sound may indicate the wall can’t support a heavy dimensional sign without additional reinforcement.
Viewing angle and height — Step back to where your customers will actually see the sign from. Ensure the chosen height and position deliver maximum visibility from the street or car park.
Local signage regulations — In Malaysia, commercial signage often requires permits from your local council (Majlis Bandaraya or Majlis Perbandaran). Confirm requirements before installation begins.
Step 2: Prepare the Wall Surface
Once the location is confirmed, the wall needs to be ready before anything gets mounted.
Clean the surface thoroughly. Remove dirt, paint flaking, dust, and any moisture. For adhesive-mounted signs or signs with silicone backing, even a small amount of grease or dust can weaken the bond over time.
If the wall has cracks or uneven sections, fill and sand them before proceeding. A clean, flat surface is the foundation of a secure installation.
For exterior walls exposed to rain, apply a primer or waterproof coating around the anchor points. This prevents water from seeping into drilled holes and weakening the mounting over time — a common issue with outdoor signage in tropical climates.
Step 3: Mark and Measure the Mounting Points
This is the step where accuracy separates a professional installation from an amateur one.
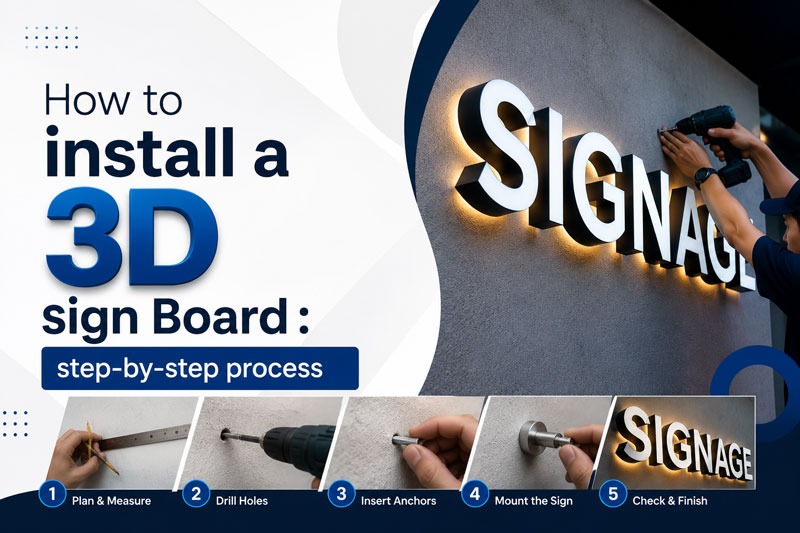
Use the mounting template that comes with your sign. Most 3D channel letters and fabricated sign boards are supplied with a paper or plastic template that maps out exactly where each anchor point needs to be drilled.
Tape the template to the wall. Use a spirit level to confirm it’s perfectly horizontal. Then use a pencil or chalk to mark each drill point through the template.
Double-check your measurements before removing the template. The golden rule: measure twice, drill once.
For signs made up of individual 3D letters (rather than a single panel), also mark the spacing between letters using a chalk line. Consistent letter spacing is what makes a sign look professionally done versus slapped together.
Step 4: Drill and Insert Wall Anchors
With the points marked, it’s time to drill.
Select the correct drill bit for your wall material. Masonry bits for concrete and brick. Standard HSS bits for metal frames or ACP panels. Ensure your drill is set to hammer mode for concrete walls.
Drill to the correct depth — typically 10–15mm deeper than your wall anchor length to allow for dust compression at the bottom of the hole.
Insert rawl plugs or expansion anchors into each drilled hole. For heavier dimensional signs (over 5kg per square metre), use heavy-duty anchor bolts rather than standard plastic plugs. In Malaysia’s heat and humidity, metal expansion anchors hold significantly better than plastic alternatives over time.
Blow dust out of the holes before inserting anchors. Loose dust is one of the most common causes of anchor failure.
Step 5: Mount the Sign Board
Now comes the part where everything comes together.
For panel-style 3D sign boards (single fabricated board with raised letters), lift the sign into position with a second person assisting. Align it with the marked anchor points, then secure it using the appropriate bolts or standoffs.
Standoffs (also called sign spacers or chrome studs) are the preferred mounting hardware for 3D signs. They hold the sign a few centimetres away from the wall, which does two things: it creates a shadow effect that enhances the three-dimensional appearance, and it allows air circulation behind the sign to prevent moisture buildup.
For individual 3D channel letters, mount each letter separately using the snap stud method. Pre-attached studs on the back of each letter slot into anchor points on the wall, allowing for precise positioning and easy future replacement if a single letter needs servicing.
Apply silicone sealant around wall penetrations to weatherproof the mounting points. Wipe away excess sealant with a damp cloth before it cures.
Step 6: Connect the Electrical Components (For Illuminated Signs)
If your 3D sign board uses LED lighting — whether frontlit, backlit, or halo-lit — the electrical connection must be handled carefully.
Run the power cable from the sign through a conduit or cable trunking to a secure junction box. The junction box should be weatherproof (IP65 rated or above for outdoor installations).
Conceal cabling within the wall or behind the sign panel wherever possible. Exposed cables not only look untidy — they degrade faster under UV exposure and heat.
Important: In Malaysia, all electrical connections to commercial signage must comply with Suruhanjaya Tenaga (Energy Commission) requirements. Engage a certified electrician for the final wiring and power connection. This is not optional — it’s a safety and legal requirement.
Test the LED system before sealing everything up. Check for consistent brightness across all illuminated sections, and confirm there are no flickering panels or dead zones.
Step 7: Final Inspection and Alignment Check
Step back. Look at the sign from a distance — ideally from the street or entrance where customers will see it.
Check for the following:
- Is the sign level? Even a 1–2 degree tilt is visible from a distance.
- Is the spacing between letters consistent?
- Are all LED modules illuminated evenly?
- Are all mounting points fully tightened?
- Is the silicone sealant applied neatly around all wall penetrations?
Make any minor adjustments before the adhesive or sealant fully cures. Once everything checks out, clean the sign surface with a microfibre cloth to remove fingerprints and installation residue.
Common 3D Sign Board Installation Mistakes to Avoid
Even experienced teams make these errors. Watch out for them:
Using the wrong anchor for the wall type. Plastic rawl plugs in concrete often pull out under the weight of a large dimensional sign. Match anchor type and rating to your specific wall material and sign weight.
Skipping the permit. Many Malaysian business owners skip local council approval assuming it’s not required for shopfront signs. It often is — and an unapproved sign can be ordered to be removed at your expense.
Poor cable management. Cables running across the wall surface look unprofessional and deteriorate quickly outdoors. Route them properly from day one.
Not accounting for thermal expansion. Metal sign frames expand and contract with temperature changes. Leave small gaps between letters to prevent buckling in direct sunlight.
When to Call a Professional Signage Installer
There’s a real difference between a sign you can put up yourself and one that requires professional installation.
If your 3D sign board is large (over 1.5 metres wide), mounted at height, involves electrical wiring, or is going onto a complex surface like glass curtain wall or ACP cladding — bring in professionals.
At Elite Sign Advertising, our installation team handles every stage of the process: from site survey and permit assistance to fabrication, mounting, and LED commissioning. We’ve completed hundreds of 3D sign board installations across Selangor, Kuala Lumpur, and nationwide — and we back every install with ongoing maintenance support.